
 5.0
5.0


Screen and Recoat Hardwood Floors: Why, When, and How
04/17/2025
Reading Time ~ 10 minutes

 Donatas

Table of Contents
When discussing hardwood floors, “screening” is just another word for “buffing.” The job is the same. We remove only the top layer of the finish and recoat the floor. Sanding is different. Here, we remove both the finish and the top layer of the wood. Then, we do refinishing.
At Big Bro Hardwood, we often have clients wondering whether their floor needs just recoating or full sanding. This guide will show you how to find the answer by examining your floor. We’ll also describe how to screen and recoat hardwood floors on your own and answer other popular questions.
What Is Screening?
Even if you clean and polish regularly, the finish gets dull with time. That’s because the floor needs a new coat every 3–5 years to protect it and give it a nice sheen. However, the new coat won’t bond unless you remove a fraction of the existing finish (“screen” it).
The procedure’s name comes from the equipment used. A screen is a mesh with abrasive particles. It works pretty much like sandpaper but isn’t as invasive because the number of abrasive particles is smaller. A screen is used under thick soft pads, which also makes it less invasive. After screening, a new coat of polyurethane is layered on top. Sometimes, more than one protective layer is needed.
The screen is attached to a weighted floor buffer machine, hence the other name of this service, “buffing.” We’ll use the words “screening” and “buffing” interchangeably in this article.

What if You Skip Screening and Coating?
Hardwood floors must undergo the screen and recoat process every 3–5 years, and sanding every 7–10 years.
If the time for buffing has come but the finish has no visible signs of wear, you might be tempted to leave it alone. Yet, even if everything looks fine, the coat has lost much of its protective property and needs maintenance. In spaces with much traffic and moisture, it might even be just bare wood. Imagine something heavy falls, someone walks in high heels, or spills a liquid, or a pet keeps running around.

Not just the coat but the wood itself will get scuffs or suffer from water damage because there is nothing to protect it. On the contrary, if the owner sticks to the maintenance schedule, the floor is covered by a thin layer of transparent plastic.

Why does this matter?
If the marks are superficial, light screening and recoating hardwood floors are enough to return the original look. However, if the wood is damaged, it will need the more costly and invasive sanding. During hardwood floor sanding, the top layer of the wood is removed, so there’s a limit to how many times sanding can be done. When this limit is exhausted, you’ll need to replace the floor.
Vice versa, if you do recoating regularly, you delay this moment. Even though the boards are old, the floors are in perfect condition, both structurally and visually.
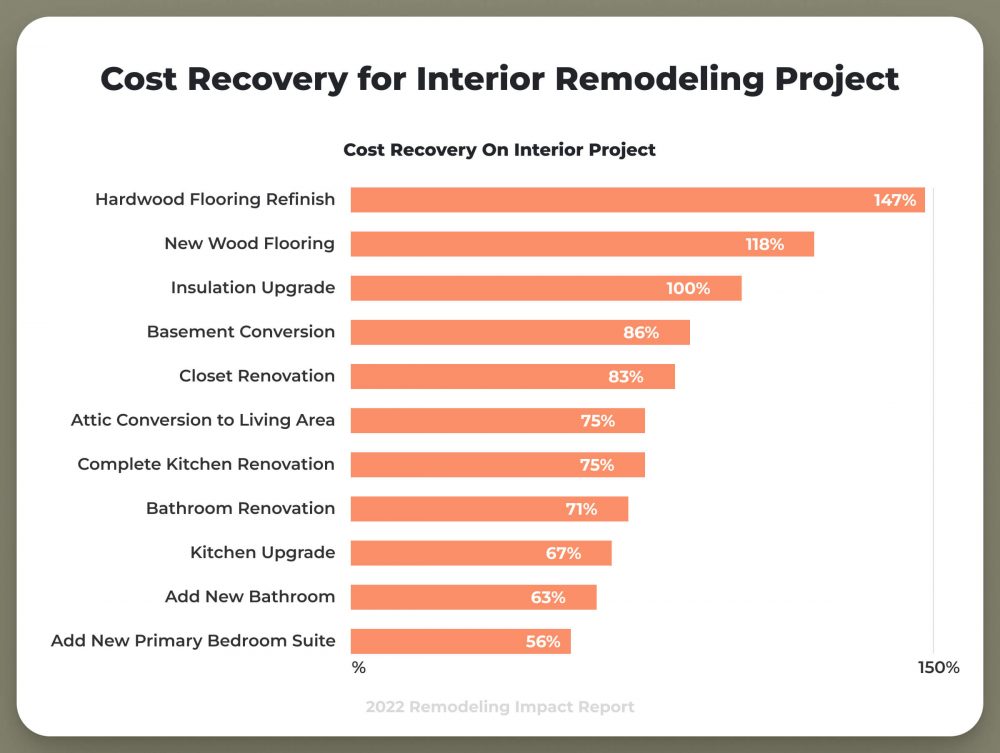
A report from the National Association of REALTORS® shows how refinishing and recoating hardwood floors are the best bet in terms of cost recovery.
What Does Screening Do?
- Shields the floor with a polyurethane coat and makes it last longer. Recoating wood floor regularly puts off invasive procedures like sanding for up to 5–6 years and puts off floor replacement, too.
- Removes slight imperfections. When you screen and coat wood floor in time, it gets the light sheen of the newly coated floor.
- Changes the sheen if you want. If you’re tired of the shiny effect, you may choose a matte or satin finish.
- Adds home value. Real estate agents find homes with well-kept hardwood floors easier to sell.

What Screening Can’t Do?
- Remove obvious traces of water damage, deep scratches and dents, and deep stains.
- Cover UV discoloration (for instance, near windows or patio doors).
- Hide heavily worn areas.
If the floor is well beyond screening, you’ll need professional hardwood floor refinishing and sanding. If a severely damaged floor is just screened, all the deep and light scratches and stains stay there. You’ll see them perfectly through the glossy new finish!
You can come across commercial polishes marketed as “finish restoration.” They do promise to make the floor “like new.” But how can a liquid reach the wood and remove deep scratches and stains?
Many products leave residue on the floors, creating problems when you eventually hire a hardwood flooring contractor to do the job properly. Some contain resins that adopt a yellowish tint with time, especially if exposed to direct sunlight.

Buffing vs. Sanding: Visual Markers Showing What Your Floor Needs
There are three reasons why screening floors may not be enough:
- The wood is damaged.
- The surface was cleaned or polished with floor wax, silicon, or oil soaps.
- The floor has been prefinished with aluminum oxide coating, which must be etched chemically, or the new coat won’t stick.

To figure out the state of your floor and which procedure you need, ask yourself these questions:
- How deep are the scratches? If they only touch the surface layer of polyurethane, they are likely to be removed if you just buff and coat hardwood floors. Otherwise, there’s no way you can get rid of them with just buffing the floors.
- What color are the scratches? Buffing hardwood floors is enough to deal with the little scratches that are clear. Sanding helps to get rid of the scratches that are light or white, at least lighter than the surface around them. Also, if a scratch is dark, even black, it’s an old one and it’s deep. The color comes from the dirt that has filled it.
- Do you see bare wood? If the floor has a grayish tone in high-traffic areas, it means the protective coat has worn out and the wood is already affected by discoloration. If you haven’t found grayish spots, chances are that buffing wood floors will be enough.
- Do you know which cleaning products have been used? If the polyurethane coat has gone through a wax cleaner like Murphy’s Oil Soap, Orange Glo, or Mop & Glo, it will have waxy, soapy residues that can only be stripped away with sanding and chemicals.

If you don’t know whether such products have been used, conduct two tests.
- Put a few drops of paint thinner (mineral spirits) on the floor. The spot should be out of traffic, but not the place you skip during an average cleaning. So, a pantry doesn’t fit (it might have been skipped during cleaning and polishing), but the spot behind the door does.
- Leave for 2–3 minutes. Having wiped the liquid with a clean, white cloth, check for brownish or yellowish residue on the fabric. If it’s there, then wax or oil soap has been used. Another sign of these products is that the residue has a waxy feel.
- Now, test for acrylic waxes or polishes. Choose another spot and put a big drop of water-ammonia mixture (1:1). Wait up to 10 minutes. If you notice discoloration (the spot grows white), it was probably treated with an acrylic wax or polish like Future or Mop & Glo. This residue needs to be removed before polishing.

Hardwood Floor Sanding and Refinishing
DIY Screening Hardwood Floor: Steps
Materials and Equipment
- Buffing machine
- Scraper with 1″ blade
- Buffer screens, buffer polish pads
- Vacuum cleaner
- Rags, cloth
- New finish and solvent that matches it
- Pad painter
- Paint roller and tray
- Protective gear, like safety glasses

Step 1. Clear the Room
Remove all the furniture. Cover vents and wall sockets with plastic or painter’s tape. Ensure there are no nails or staples above the boards – they can tear the screen. Check for loose boards. Vacuum dust and debris.
Step 2. Remove the Residue
If the surface has been treated with a commercial hardwood floor cleaner or polish, it may have a thin layer over it that might keep the new finish from bonding. Spray Pallmann Clean Strong and water mixture (10:1) on the floor, then use a white polish pad under the buffer to remove the residue.
Step 3. Practice Using the Buffing Machine
When you buff hardwood floors, don’t let the buffing machine stay in one place while the motor is working, and don’t apply too much pressure. It may damage the floors, leaving small scratches.

Step 4: Lightly Abrade the Top Layer of the Floor Coat
Screening hardwood floors by hand is hard and time-consuming, compared with a buffing machine, especially when there’s a lot of space. If you use a buffing machine, move it along the grain of wood and overlap your paths to ensure the scuffing is even. In the corners, abrade the finish manually. After that, the room needs a deep cleaning, so you’ll need to vacuum and wipe up everything.
Screen and Recoat Wood Floor
Step 5: Apply the Finish
Apply the polish with a paint roller, moving along the wood grain. You may want two protective layers of the finish if the floor is worn out.

Step 6: Leave to Dry and Cure
After you buff hardwood floors, at least 24 hours should pass before you walk into the room or bring back all the furniture. You can find the exact time in the manufacturer’s instructions. However, the finish will need much more than that to cure fully.
DIY vs. Hiring a Pro
Now that you know how to buff hardwood floors by hand or using a buffing machine, you’re ready to decide whether to hire a wood floor repair company.
Practical knowledge of how to buff wood floors yourself is essential for success, from evaluating and testing the finish and boards to choosing the right screen, buffing machine, and polish.
DIY projects often take longer than planned. During this time, it will be impossible to use the rooms, the dust will spread around the house, and the furniture and things from those rooms might get under your feet.
Hardwood floor refinishers from Big Bro Hardwood have experience in such projects and guarantee professional service. Hardwood floor refinishing specialists do the job within the agreed-upon timeframe, while everyone lives the life they’re used to.

Final Thoughts
Screening wood floors refreshes and protects them from wear, and also allows you to change their sheen. Compared to sanding, screening is cheaper and doesn’t remove the top layer of the wood.
Yet screening is only used for floors in good shape. If they’re heavily worn, discolored by UV, or have deep stains, only sanding and refinishing hardwood floor can restore them. At Big Bro Hardwood, we’re ready to help you with hardwood floor refinishing or recoating and help you identify which of them is necessary in your situation.
frequently asked questions
How Much Does It Cost to Screen and Recoat Hardwood Floors?
The price is calculated per square foot. We also consider location, the desired finish, and the extent of damage. Floor refinishers from Big Bro Hardwood aren’t subcontractors or paid on commission, so there are no middlemen in the chain. To get the precise answer to the question “How much does it cost to buff and coat hardwood floors?” and find hardwood floor refinishing nearby, contact us.
How to Buff out Scratches on Hardwood Floors?
Some people say you can buff out scratches on hardwood floors by hand. Yet, instead of a single light scratch, you’ll get a lot more surface with an abraded finish, where the wood is prone to even more wear. Never use this method.
Can You Buff Engineered Hardwood Floors?
Yes, you can. Due to their experience, our hardwood floor refinishing specialists know how to buff engineered hardwood floors effectively.
Overall rating
5

(2 vote(s))
Comments